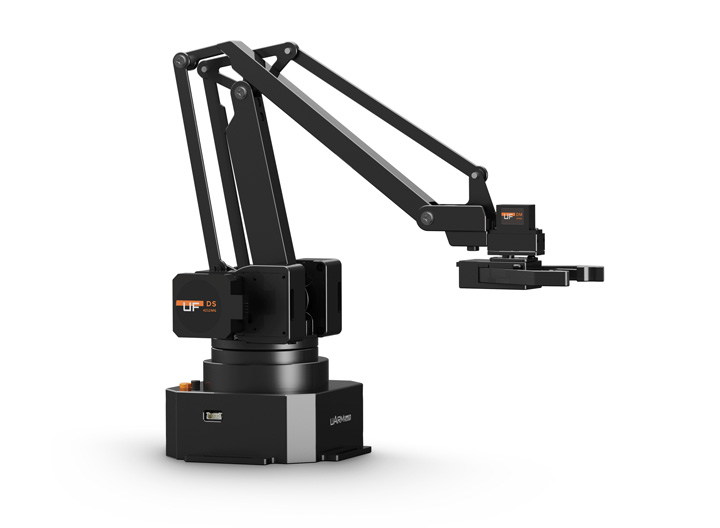
UFACTORY’s desktop robotic arm does a little bit of everything.
As a digital experience designer, I’m used to creating the illusion of motion on screens and devices. But I’ve always been fascinated by real-world motion – in kinetic sculpture, in theme park experiences, and in theatrical spectacle.
So when I saw the uArm Swift, a multifunctional desktop robotic arm, I thought it could be an interesting opportunity to get my hands on some entry level electromechanics. The device included a variety of modular attachments, ranging from sensors and actuators to lasers and 3D printers, offering extensible functionality. The project’s Indiegogo funding campaign was a viral success – raising almost a million dollars from a $10,000 goal.
I contributed, and before I knew it, my robot arrived from China. Here are my initial impressions:
I was impressed with the solidity of the robot – it’s heavier than it looks – and the build quality semed to be top-notch. The IKEA-like instruction manual guided me through basic setup, which only took a few minutes.
Soon enough, I was able to try out the robot’s ‘learning mode,’ which lets the user record a motion by manipulating the arm, then play back the path using the robot’s motors. This is a nice way to get acquainted with the arm’s strength and its range of motion; it’s quiet and smooth, but it was hard for me to judge the accuracy of its mimicry. So I attached one of its extensions, the ‘universal holder,’ and handed it a Sharpie to see if it could reproduce a quick handwriting sample.
As you can see above, it did a great job. The device promises sub-millimeter accuracy, and while there’s some visible jagginess, the nuances of the ‘O’ and ‘C’ come through in the details.
The universal holder is just one of a slew of ‘hands’ that can be attached to the robot. Others include suction-cup and claw modules, which can be computer-controlled to manipulate physical objects. But the ones I found most intriguing were those geared towards makers.
The first of these is a laser engraver. The unit ships with protective goggles, and a fair number of warnings to keep your hands away from the laser beam, so it promised some serious business. After attaching the laser, I connected the robot to my laptop via USB, and ran the uArmStudio application, which offers control interfaces for most of the device’s functions. A dedicated tab for engraving provides a variety of ways to design your image – typing text, dragging icons, or using external files. I imported an SVG logo and gave it a whirl.
My first attempts seemed to have no effect, but a little research led me to realize that I hadn’t set the focus point correctly. Once this was done, I was up and running, and the smell of burning cardboard filled the room. The laser is not powerful enough to cut, but I was impressed with the simplicity of the operation and its precise, tactile results.
The 3D printing setup is a bit more involved; a heating unit is attached to the robot arm, then connected by a short tube to an extrusion motor, into which a coil of ABS plastic is fed. A separate application, Cura, controls the printing. I imported a 3D ‘M’ shape, adjusted its scale, and sent it to print. Here’s what happened:

- First attempt: The print head wasn’t focused correctly, put all its weight into my tabletop, and lightly damaged its surface.
- Second attempt (pictured): Better, but some of the plastic output didn’t lie completely flat on the surface, and after about 15 minutes, the print head knocked the entire structure loose.
- Third attempt: After applying adhesive to the print surface, the print stuck much better, but the plastic stopped extruding after a few minutes.
I honestly didn’t expect much from the 3D printing functionality – I’ve had more expensive, dedicated 3D printers fail regularly, and I knew that without a precise leveler, heated print bed, and controlled-temperature environment I was going to have mixed results. Others online seem to have had success with this, but I was frustrated; after a few more attempts, I gave up troubleshooting.
The uArm has serious open-source credentials. It’s compatible with a variety of development platforms, and provides interfaces for modular sensors and actuators from Grove. My purchase bundle included a variety of these attachments, including an electromagnet, a fan, and temperature and motion sensors.
The Studio app includes a version of Blockly, a Google-developed visual programming language mostly meant for educational purposes. Using Blockly I was able to build a set of instructions for moving the arm from point to point. I expanded this with a bit of trigonometry to script out a simple string-art star. It would have been faster to type this code in Javascript, but the core application doesn’t support that.
Without visible output, the elegance of the motion was hard to assess. I decided to attach a light to the end of the arm, but the LED module I thought I’d ordered turned out to be an LCD display. I hacked together an alternate using a flashlight, an old slide transparency, and a piece of cardboard with a pinhole cutout, giving me a small point of red light.

Using a long-exposure app on my phone, I was able to capture the results. There were a few hiccups in the process, but compared to my 3D printing attempts, it seemed effortless.
There’s a lot more to the device and its ecosystem, including mobile apps, Bluetooth connectivity, and an OpenMV attachment. Users have come up with some truly creative uses for the uArm, including robotic painting and a mechanical paper clock.
There are some downsides; the documentation is clear but limited. The lack of specs on the arm’s range of motion is frustrating. When turned off, the arm goes limp and thuds down abruptly onto its tabletop. It doesn’t offer full 6-DoF rotation – it always ‘points’ down. And I can comfortably call the 3D print attachments unusable.
As part of the Indiegogo campaign, I got the arm bundled with most of its accessories for about $500. As of today, it’s out of stock, and retails for roughly twice that amount – pricey for a hobbyist device. But it’s reliable, solidly fabricated, and its open-source provenance means that, with a little skill and experimentation, you can have this robot following your commands in no time at all.